In this article we will talk about the basics of R-Studio, from the installation to its basic functions and settings.
Where to download R-Studio?
We are always including the latest versions of R-Studio in our file center. All the download links are from the the original developer of R-Studio (Posit) and we do not host any version of R-Studio.
To download R-Studio for your operating system please click here >>
Then follow the installation. If faced with any problems you can ask for help in our community forum:
Scientific Tools Community - Scientific Tools
User interface and layout if R-Studio
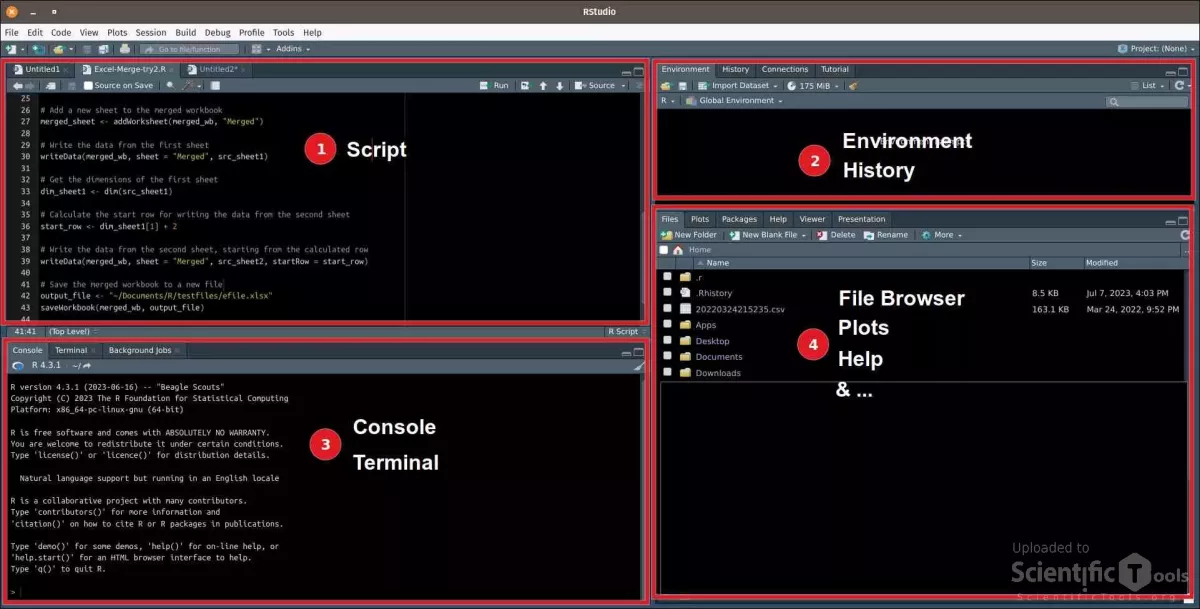
After installing R-Studio, you will see the default layout of R-Studio, which consists of 4 main panels, as shown in the following image:
1- Script:
In this panel you can write your R scripts or view the contents of a .R file when you open it. From this panel you can execute all or part of your scripts using the buttons at the top right corner (Run and Source).
2- Environment & History
This panel contains several tabs. The most important are Environment and History.
History tab: This tab provides a list of commands that have been run previously.
Environment tab: This tab contains a clear list of the variables you have created.
3- Console & Terminal:
This panel also contains 3 tabs which the two important tabs are console and Terminal.
Console: Commands are executed and the results are displayed here.
Terminal: The RStudio Terminal provides access to the system shell from within the RStudio IDE. It supports full-screen terminal applications such as Vim, Emacs and tmux as, as well as regular command line operations with line editing and shell history. This is mainly used by R-Studio power users.
4- Files, Plots, Help & ...
Files: This tab displays the file system of your operating system. From this section you can open your directories and paths where your projects or ".R" files are stored. It is basically a file browser.
Help: In this tab you can view help and documentation for all commands and packages.
How to create a project in RStudio?
To start working with a new dataset, you should create a New Project.
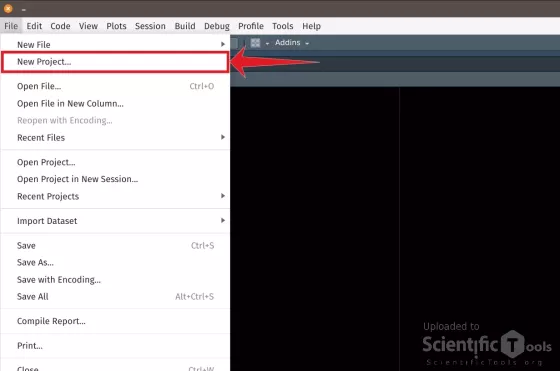
To create a new project, first click on File And then New Project as it is shown in the following image:
Then a new window will popup asking for creating a new working directory or defining an existing one for your project.
Creating/defining a new directory provides a default working directory and logical location for related files to your project such as raw data tables.
You have the option to save any accompanying Excel documents or text files into a newly created or chosen folder, which can be easily accessed from within R. Once stored, you can utilize the imported data to perform data analysis or create visualizations as needed.
R-Studio console and executing commands
In the Console tab, we are provided with information about the current R version and basic commands to experiment with. After the command descriptions, we can input our own R code, press Enter, and view the resulting output below the code line (e.g., try running 2*2 and observe the outcome). Essentially, we can perform any task here that we would typically do in any other R program. Some examples include:
- Conducting simple or complex mathematical operations
- Assigning operation results to variables
- Data import
- Installing and loading R packages
- Creating common R objects such as vectors, matrices, or dataframes
- Exploring data
- Performing statistical analysis
- Building data visualizations
It's important to note that code executed directly in the console is not saved for future use. If we need to reproduce code for a specific task (which is often the case), it is necessary to record and regularly save it in a script file instead of relying solely on the console.
Examples:
1- Arithmetic Operations:
2- Variable Assignment:
# Assigning a value to a variable
x <- 5

# Performing operations using variables
y <- x + 3
z <- x * y
What is Environment in R-Studio?
In RStudio, the "environment" refers to the space where objects, such as variables and functions, are created and stored during an R session. It is a fundamental concept in R that helps manage and organize data and computations.
The environment in RStudio consists of the following components:
- Global Environment: The global environment, also known as the global workspace, is the primary environment where objects are created when you execute code in the RStudio console. It holds all the variables, functions, and other objects that you define during your session. The objects in the global environment can be accessed and manipulated from any part of your R session.
- Environment Pane: The Environment pane is a panel in RStudio that displays the contents of the global environment. It provides a graphical representation of the objects in the workspace, including their names, values, and data types. The Environment pane is located in the top-right area of the RStudio window by default.
- User-defined Environments: In addition to the global environment, you can create your own custom environments in R. These environments act as separate spaces to store objects and can have their own specific rules and scope. User-defined environments are useful for organizing related objects and creating modular code structures.
The environment concept in RStudio helps you manage and keep track of objects in your R session. You can view, modify, and interact with objects in the Environment pane, making it easier to work with data and analyze results.
Example:
Here's a simple example of running a script in RStudio and observing the output in the Environment pane:
1- Create a new R script file by clicking on "File" in the RStudio menu, selecting "New File," and choosing "R Script."
2- In the script editor, enter the following code:
3- Save the script file with a suitable name and location on your computer.
4- To run the script, you can either click the "Source" button in the script editor toolbar or use the keyboard shortcut Ctrl/Cmd + Shift + S.
5- After running the script, switch to the Environment pane in RStudio (typically located in the top-right corner of the RStudio window). You should see the following objects listed:
- x: A variable with a value of 5.
- y: A variable with a value of 3.
- result: A variable with a value of 8.
This demonstrates how running a script in RStudio executes the code line by line and stores the resulting objects in the environment. The Environment pane provides an overview of the created objects, allowing you to inspect their values and properties.
Most used Rstudio keyboard shortcuts
R-studio comes with several keyboard shortcuts to help improve productivity and streamline your workflow. Here are some of the most important keyboard shortcuts in RStudio:
- General Shortcuts:
- Ctrl+Enter: Run the current line or selection.
- Ctrl+Shift+Enter: Run the current line or selection in the console and move to the next line.
- Ctrl+Shift+F10: Run the current line or selection and keep the cursor in the same place.
- Ctrl+Shift+C: Comment/uncomment the current line or selection.
- Ctrl+Shift+D: Duplicate the current line or selection.
- Ctrl+Shift+M: Insert a new Markdown chunk.
- Ctrl+Shift+K: Knit the current R Markdown document.
- Ctrl+Shift+O: Organize the code.
- Ctrl+F10: Stop the current computation.
- Navigation and Editing:
- Ctrl+1: Switch to the source editor.
- Ctrl+2: Switch to the console.
- Ctrl+Shift+F: Find in files.
- Ctrl+D: Delete the current line.
- Ctrl+L: Clear the console.
- Ctrl+Shift+Z: Redo.
- Ctrl+Shift+F12: Toggle the focus between the source editor and console.
- Document and Workspace:
- Ctrl+S: Save the current document.
- Ctrl+W: Close the current tab.
- Ctrl+Shift+W: Close all tabs.
- Ctrl+Shift+N: Create a new document.
- Ctrl+Shift+P: Open the package documentation.
- Ctrl+Alt+W: Close all panes.
- R Markdown:
- Ctrl+Alt+I: Insert a chunk.
- Ctrl+Alt+T: Insert an inline code chunk.
- Ctrl+Alt+B: Insert a bold text chunk.
- Ctrl+Alt+I: Insert an italicized text chunk.
- Ctrl+Alt+O: Insert an ordered list chunk.
- Ctrl+Alt+U: Insert an unordered list chunk.
These are just a few of the many keyboard shortcuts available in RStudio. You can explore more shortcuts and customize them by going to "Tools" > "Modify Keyboard Shortcuts" in the RStudio menu.


